


From our workshop
All building models are built in our model making workshop using weatherproof materials or natural stones.
We mainly use plastics and sandstone. Here we present a small excerpt.
Albrechtsburg Meißen
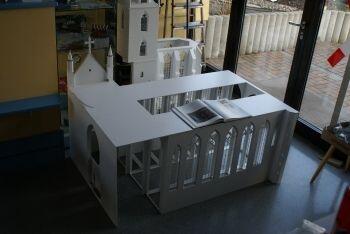
At the moment a larger structure is being built in our model making workshop.
The Albrechtsburg Castle in Meißen, with gigantic dimensions.
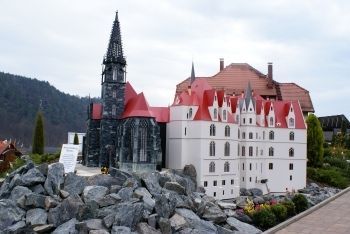
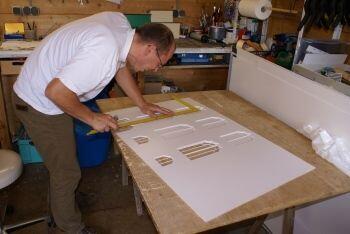


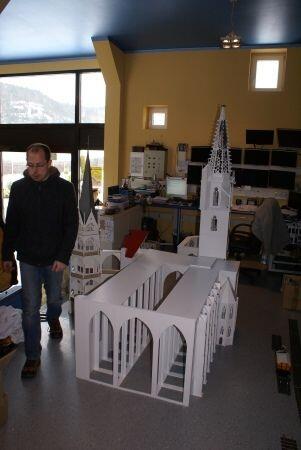
The huge dimensions of this structure are slowly becoming apparent.

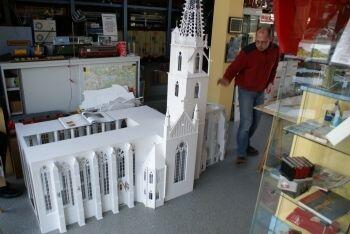
The first tower already towers over our model maker, and the cathedral is yet to come !!

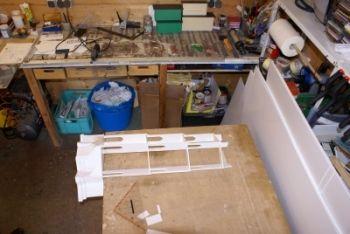
Since there was no longer enough space in the model workshop, the shell moved into the show workshop.

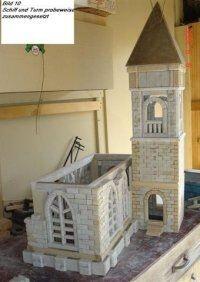
The first parts of the Albrechtsburg are finished and have already been assembled on a trial basis.

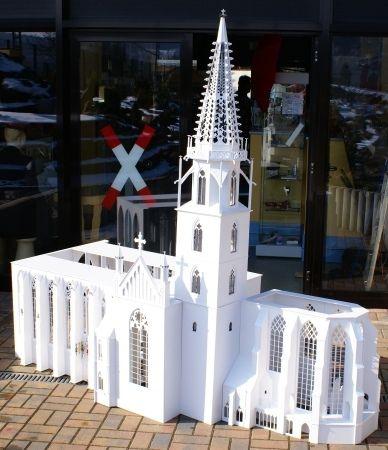
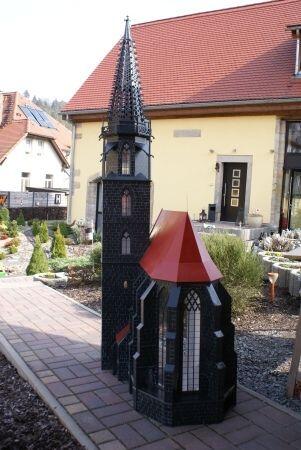
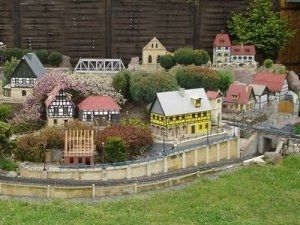
The finished model in our facility.
Meissen Cathedral
The Meissen Cathedral is built as part of the Albrechtsburg.


Geibeltbad Pirna
Pictures cooming soon.
This is the default text field.
This is the default text field.
This is the default text field.
This is the default text field.
This is the default text field.
This is the default text field.
In the following we would like to present you the private self-builds of our team members private self-builds by Reiner Hendrich
(are NOT in the Eisenbahnwelten) .
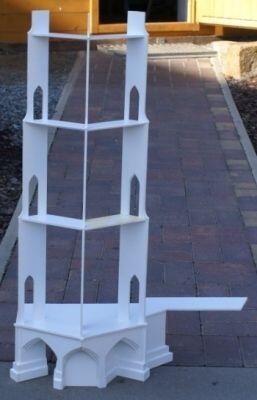
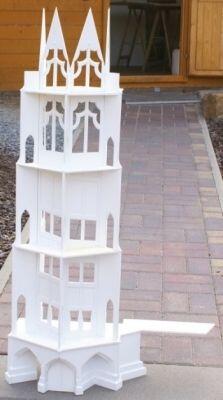
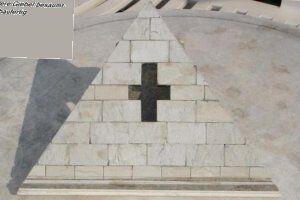
Church with a sandstone tower
Self-construction of buildings by our team member Reiner Hendrich.
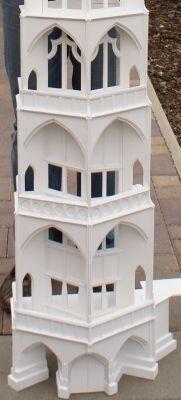
Here we would like to introduce you to Reiner's beautiful self-made buildings (with ei), which are located on his own garden railway. All buildings are assembled from countless individual parts.
ALL SANDSTONES ARE SAW RIGHT YOURSELF!
Just let the pictures take their effect, it is always difficult to say from the appropriate angle, is this the model or the original?

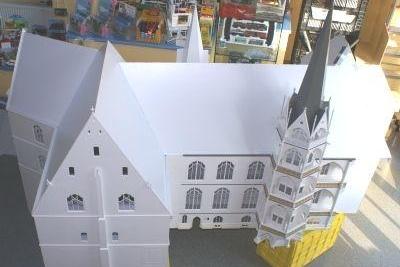
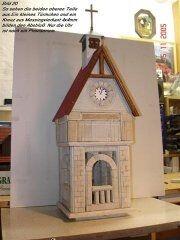
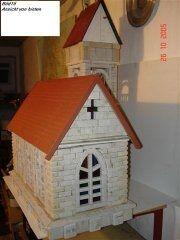
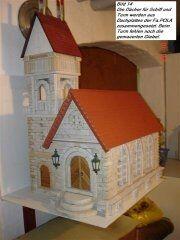
Reiner is currently working (with ei) on a church.

This is the default text field.

This is the default text field.

Reiner is currently working (with ei) on a church.

The nave is built. The still open parts of the wall are still clogged.
ALL STONES ARE HAND SAW AND THE EDGES ARE BROKEN!

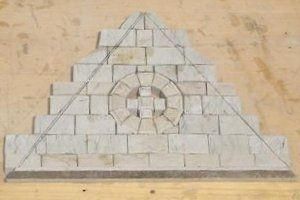
Entrance gate and stairs.

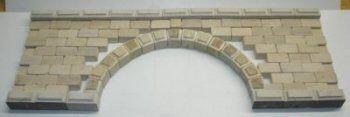
Bridge arch made of sandstone
Self-construction of a sandstone bridge by our team member Reiner Hendrich.
We are building a stone bridge for the garden railway. There are bridges in the most varied of variants everywhere. They are also always an eye-catcher on a garden railway system.
The dimensions of the stone bridge:
- Length 440 mm, height 165 mm, width 200 mm
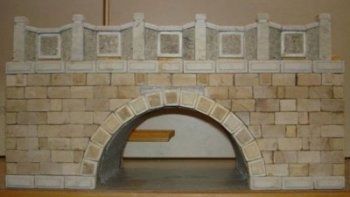
In nature this bridge would be about 10 m long.
What do we need for that?
1. Sandstone waste from a stonemason
2. Silicone as an adhesive
3. A tile cutting machine, equipped with a suitable diamond cutting disc, cutting depth at least 20 mm
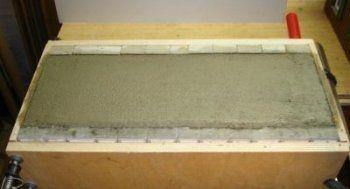
4. Some plywood to build the casting mold
5. Cement mortar
6. A few pieces of 6mm round iron for the reinforcement - 4 pieces each 40 cm long
To get the curve (bridge arch) right, we need a 20 cm long plastic tube (diameter 200 mm) see picture, which is cut in half. We'll need this half tube later for the casting mold.

First we manufacture the different stones (drawing). There will be around 300 in total.

ATTENTION when cutting: Wear protective goggles - work gloves - respiratory protection.

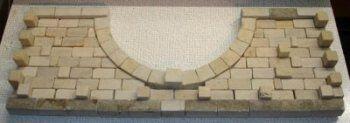
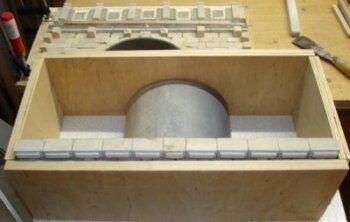
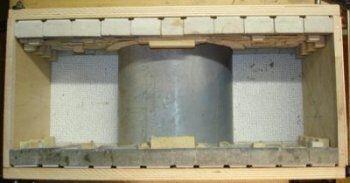
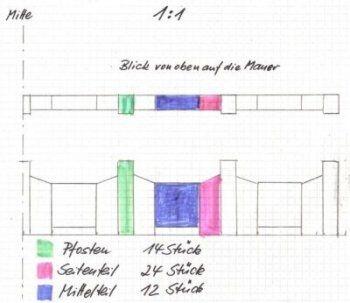

In the meantime we will manufacture the bridge walls, which will later be attached to the two long sides of the bridge.

First cut the parts again and then glue them to the dry stone bridge.
Another important note about working with silicone:
We can only get a good, durable glue point if the sandstones are really dry!

The EISENBAHNWELTEN in the health resort of Rathen wish you lots of fun recreating it.
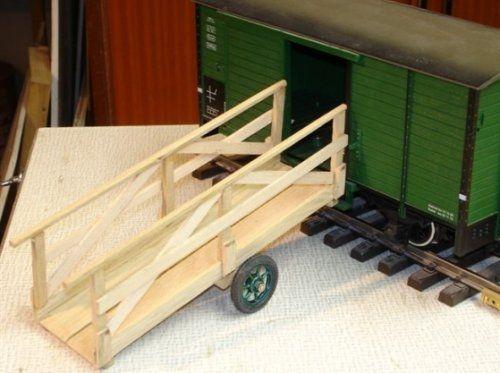
Loading ramp
Self-construction of a mobile loading ramp by our team member Reiner Hendrich
Loading ramps were used in rural areas to load goods, especially cattle. Often these, mostly wooden frames were fitted with wheels to make them easier to transport. These wheels were made of wood or iron, sometimes with rubber tires.
For this little tinkering we need a small circular saw (e.g. PROXXON), a small drill (e.g. PROXXON) 0.9 and 3.1 mm drill bits and a normally equipped tool box. We also need wood glue (e.g. PONAL) and steel pins 1.0 x 12 mm.
The EISENBAHNWELTEN IM KURORT RATHEN hope you enjoy building.

- Component number 1
2 x oak beams 205 x 10 x 4 mm - Component number 2
2 x floor boards 200 x 27 x 3 mm - Component number 3
1 central beam 66 x 10 x 8 mm

- Component number 4
2 external beams 64 x 8 x 5 mm - Component number 5
6 supports 56 x 6 x 4 mm - Part number 6 6 stiffeners 15 x 8 x 3 mm
- Component number 7
2 handrails 230 x 5 x 5 mm - Component number 8
2 central strips 192 x 8 x 3 mm - Part number 9 fit 2 struts 82 x 8 x 3 mm
- Component numbers 10 and 11
Fit 4 struts 108 x 8 x 3 mm - Part number 12 1 axle brass 92 x 3 mm thread M3
- Component number 13
2 nuts M3 - Component number 14
2 wheels wood / metal approx. 40 mm
The first thing to do is to assemble the ramp floor.


Load 1
A rainy day
A little tinkering, construction of a device for the transport of freight and passenger car axles by our team member Reiner Hendrich.
What materials and tools do we need?
- A well-equipped tool box,
- a small drill if possible with a stand (e.g. PROXXON)
- a small circular saw with height adjustment if possible (e.g. PROXXON).
- Furthermore drill 1.2 mm / 2.0 mm / 2.5 mm
- as well as cutter drill M2.5.
- For wood we need hardwood strips 10 x 20 x 600 mm
- and 14 x 14 x 100 mm for the spacer blocks.
- We use flat material brass 2 x 8 x 70 mm for fastening to the floor of the car. (You can also save these 2 parts if you screw the wood directly to the floor of the car.)
- Waterproof wood glue is still missing,
- Wood glaze (color at your own discretion),
- 4 screws MS hexagon head M 2.5 x 20 mm,
- 2 screws MS countersunk head M 2.5 x 8 mm and 2 nuts MS M 2.5
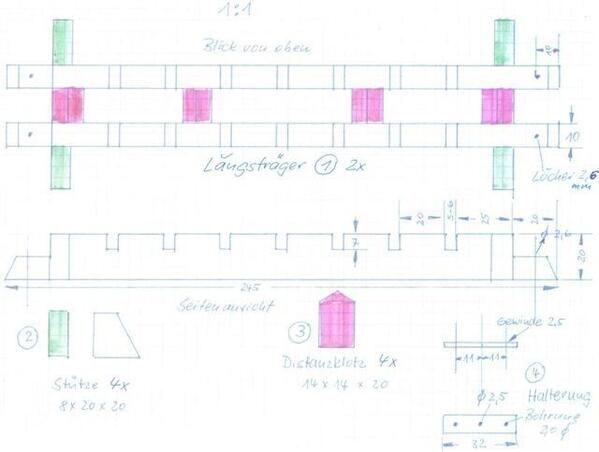


Here again for everyone who would like to recreate the individual work steps:
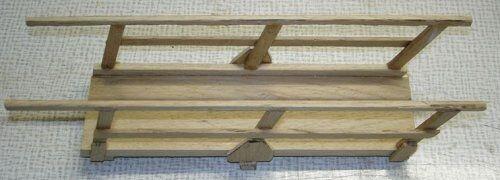
1. Production of the 2 longitudinal beams according to the drawing
2. Production of the 4 spacer blocks according to the drawing
3. Production of the 4 supports according to the drawing
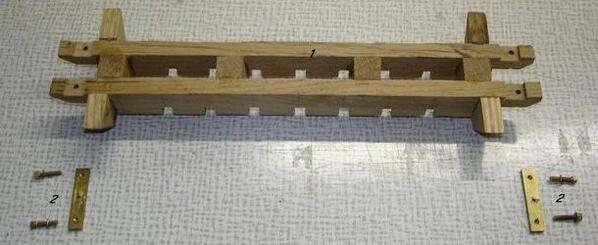
4. Production of the 2 brackets, core hole for M 2.5 thread approx. 2 mm (only if required)
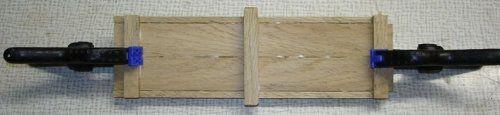
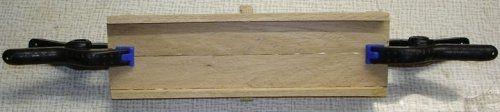
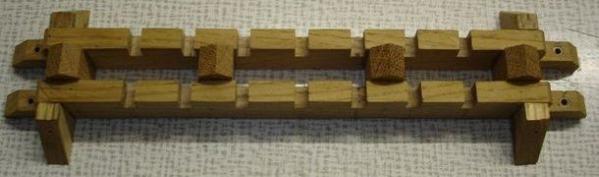
5. If the Parts are ready, the two side members are
glued with the 4 spacer blocks. Additionally secure with pins 1.4 x 20 mm. ATTENTION Pre-drill hardwood,
1 tenth of a mm smaller.
6. Glue on the 4 side supports
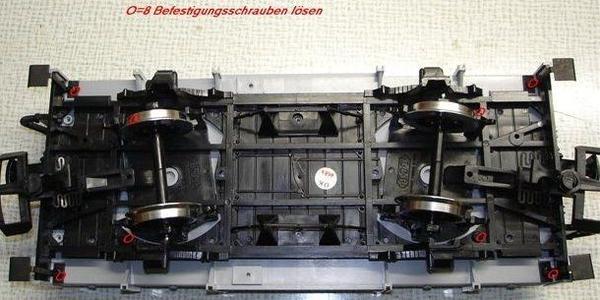
7. Dismantling the freight wagon, ie loosening the 8 screws on the lower part of the wagon (see photo)
8. Marking and drilling the mounting holes on the wagon floor (photo)
(only when using the two brass brackets )
9. Color treatment of the wooden parts
10. Fastening the complete bracket to the wagon floor
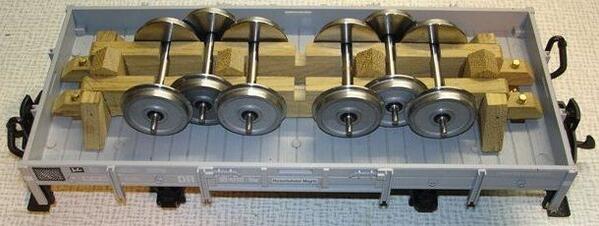
11. Assemble the freight wagon, making sure that the two axle brackets can move easily. 12. Insert the goods to be
transported (axles) and take a test drive
And here again the exact parts list:
- 2 hardwood longitudinal beams 245 x 20 x 10 mm
- 4 supports hardwood according to drawing
- 4 hardwood spacer blocks 14 x 14 x 20 mm
- 2 brackets MS 2 x 8 x 32 mm
- 4 hexagon head screws MS M2.5 x 12 mm
- 2 countersunk screws MS M2.5 x 8 mm
- 2 nuts MS M2.5
- Steel pins 1.4 mm
- Glue and paint
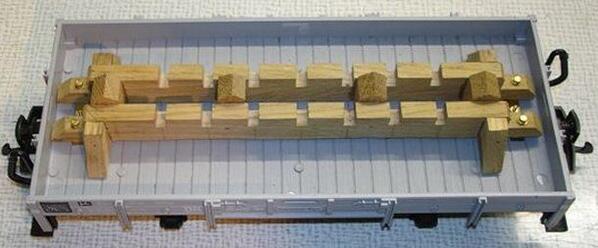
Load 2
Our team member Reiner Hendrich builds a timber load as a load for flat wagons
The Eisenbahnwelten in the health resort of Rathen wish you a lot of fun with the construction.

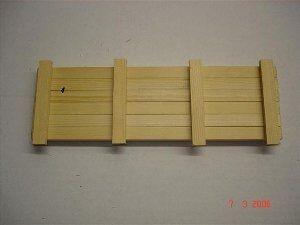
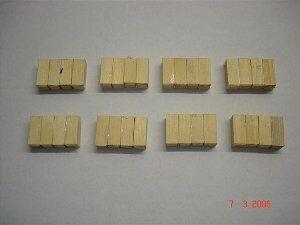
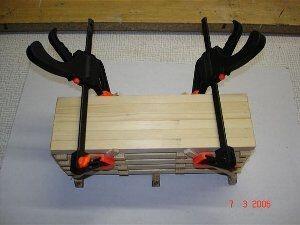
If we want to make freight train traffic on our garden railroad interesting, we need a wide variety of loads. Different loads can be made out of wood. The starting point for the work are stake cars from the LGB Toy Train range. Since these wagons are blue, we painted the loading areas black. In order to keep the total weight of the train as low as possible, we use a little trickery. The load optically consists of a total of 30 bars 10 x 10 x 200 mm. But only 14 bars (No. 3) are needed.
5 bars each for the sides and 4 bars for the top layer. We only see the ends of the remaining 16 bars anyway. For this we take pieces 10 x 10 x 20 mm (No. 1). These are fitted in when gluing with PONAL-Wasserfest. At the bottom we glue three spacer blocks 5 x 10 x 88 mm. These make unloading easier, for example with forklifts. We also use the lower wooden spacers to attach it to the floor of the car. 3 small wood screws 2.5 x 15 mm hold the whole stack. To do this, three 3 mm holes are drilled in the floor of the car.
Here is the material list:
- 3.2 m pine bar 10 x 10 mm
- 1.8 m pine bar 5 x 10 mm
- approx. 0.8 m pine bar 4 x 8 mm
- 3 wood screws (2.5 x 15 mm)
- PONAL wood glue
- Copper wire


Private self-build by Rainer Schüßler (are NOT constantly in the railroad worlds) .
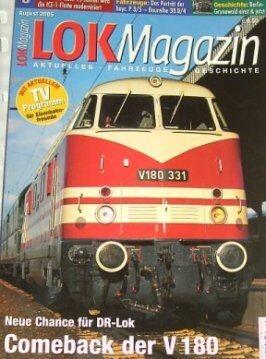
Diesel locomotive V180 of the DR
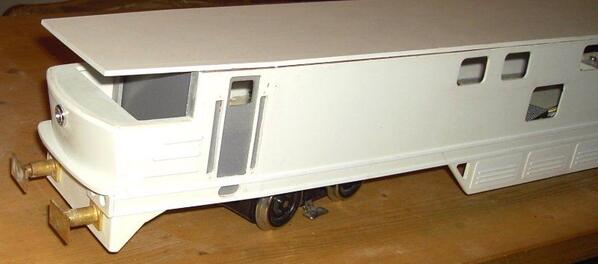
Self-built a diesel locomotive of the series V180 of the Deutsche Reichsbahn in the hobby workshop of our team member Rainer Schüßler
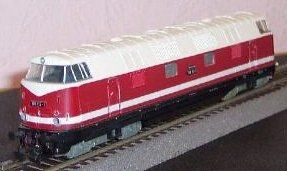
It has been my wish for a long time to have a V180 diesel locomotive of the Deutsche Reichsbahn on my small, private LGB layout. Since I'm not a "rivet counter" and enjoy all the trains that make their rounds through my garden, I have no problem when a Rhaetian crocodile meets the Brocken Railway in the station or a switchgear steam locomotive is next to a standard gauge locomotive. The decisive factor was my wish, a V180 was needed. As a child I spent many hours at the Pirna train station and looked up the shapely V180 with its unforgettable diesel sound. In advance, I pondered for a long time about the scale, materials and manufacturing steps for self-construction.
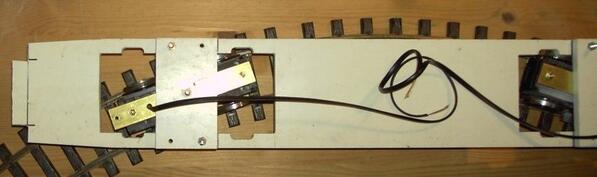
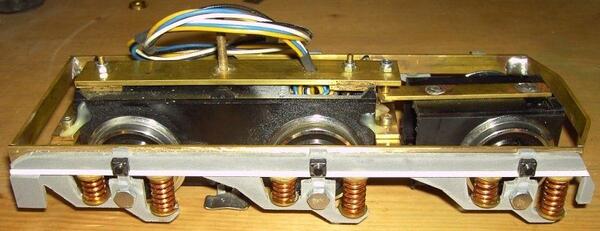
After I finally found a drawing and dimensions on the Internet and looked at countless photos, it finally started at the end of June 2005. I have now chosen 1:27 as the scale for my self-construction, i.e. the same one that LGB is currently using for its standard gauge locomotive. Two LGB drives will be used as the drive; building both drives myself seemed too costly to me. Of course, I had to make some compromises. The two LGB drives have an axle base of 88 mm, but on a 1:27 scale this should actually be 120 mm on my V180 B'B '. Nevertheless, the model with its dimensions of length 710 mm, width 110 mm and height 160 mm will be an impressive model.
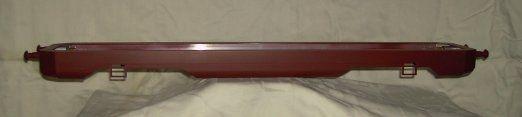
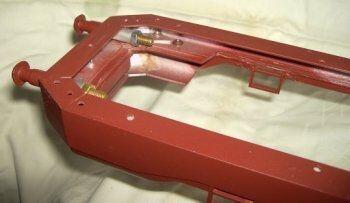
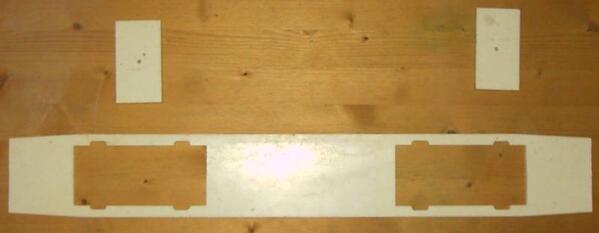
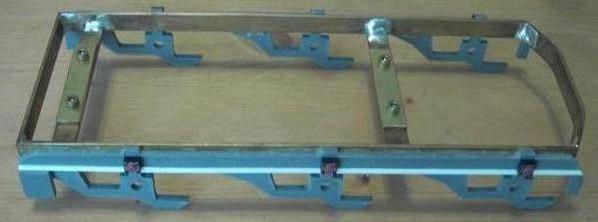
Since inexpensive brass profiles were quickly not available, I used aluminum profiles for the chassis. If you go through hardware stores with open eyes, you will find many usable profiles and materials. For example, a cable duct that is exactly the right shape will be used for the roof. I cut out the individual profiles for the chassis, screwed them in and additionally glued and filled with epoxy resin.

My "blueprint"

Various aluminum profiles and the cable duct


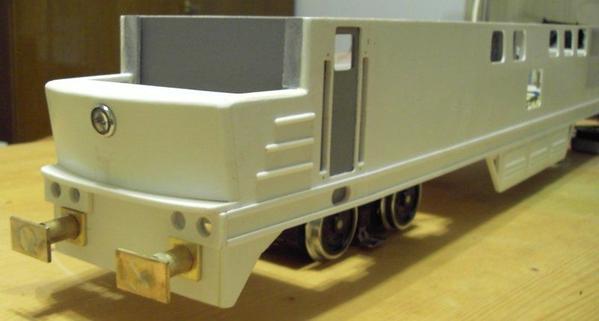
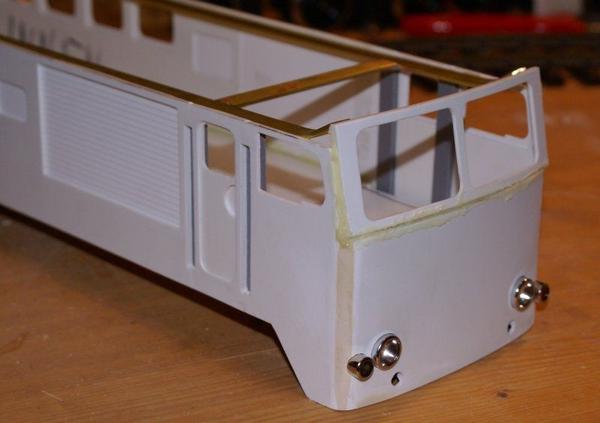
I soldered the basic structure of the driver's cab window from 2 mm brass profiles. 4 mm wide plastic strips are glued to the 2 mm thick profiles, which will then serve as a frame for the acrylic glass panes.

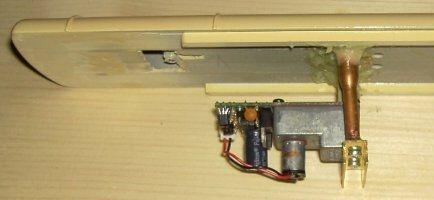
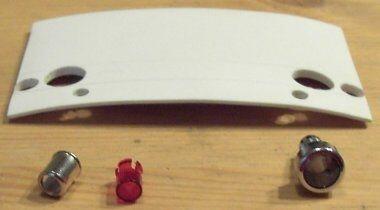
For the headlights I used LED sockets with glass lenses from Conrad, for the taillights red LED covers were fitted into the metal sleeves of cinch sockets.

Driver's cab 1 with inserted window frame and with window frames already glued on.
Engine driver "Klaus" has now survived his cosmetic operation from wrench holder to engine driver after an "arm break" and the functional test of the driver's cab lamp was also positive.
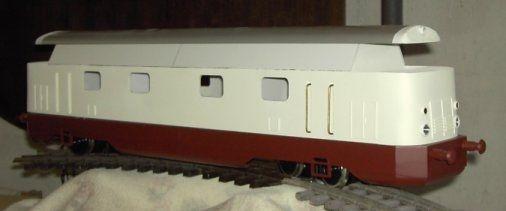


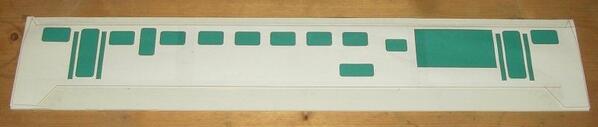
The painting work is currently in progress. The interior of the driver's cab is painted green and the housing in striking ivory and red. I use DupliColor paint based on synthetic resin. However, repainting with a brush is necessary on some edges because the masking film is not always 100% in contact with these areas.
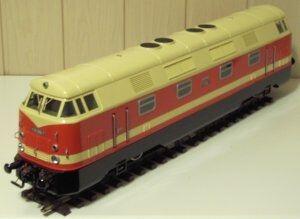
The fully painted model will certainly take you on loan from time to time on the Bad Schandau - Dresden main line in the Eisenbahnwelten in the health resort of Rathen. The right four-part double-decker train is currently being built in my hobby workshop.

At the moment the two bogies of the LGB-ICE are being exchanged for 2 LGB bogies of the V200, which finally gives the model the realistic wheelbase.
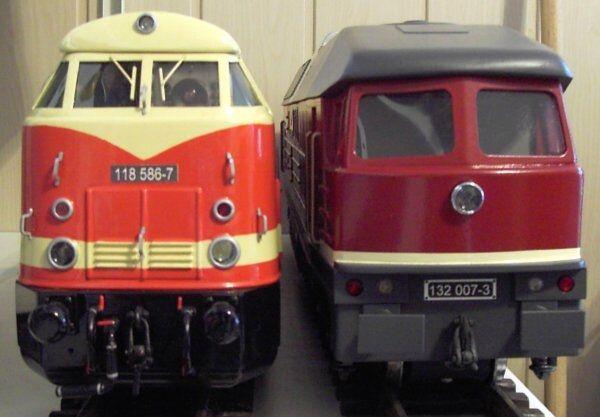
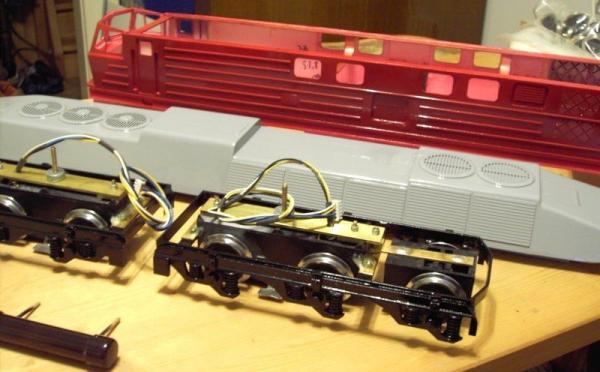
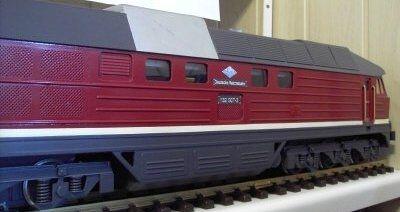
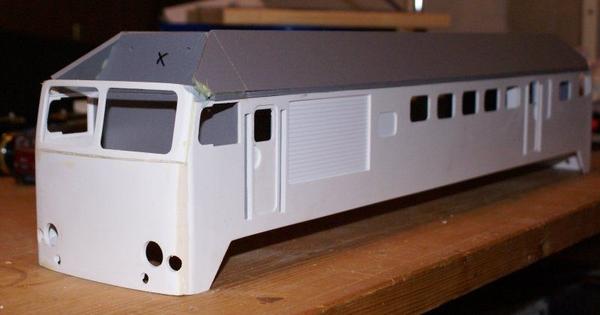
Diesel locomotive BR132 of the DR
Self-made diesel locomotive BR 132 (Ludmilla) of the Deutsche Reichsbahn
Take the 2 bogies on which my V180 stood before it was placed on the one with a larger wheelbase (from the V200 or Dash-7) and a bogie without a drive from the ICE (many thanks to Lothar for the donation). The bogie of the ICE is sawed exactly in the middle. It is then attached to the two bogies to get 2 three-axle bogies. However, this 3rd axle must be movable laterally and vertically in the bogie in order to be able to drive through R1 radii and not to lift the driven axles off the rails on inclines or descents. This is why the 3rd axle is pressed onto the track with a spring, similar to the newer forerunners and trailers of the 996001.

The 2 three-axle bogies are created from 2 drives from the LCE and one drive without motorization.

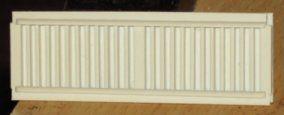
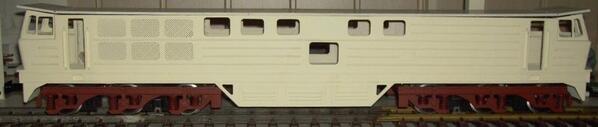
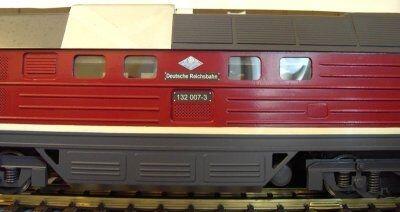
A side part from the Revell kit for H0 served as a model (the side part greatly enlarged above). Below is a side part that I hand-milled from 3 mm polystyrene.

The ventilation grilles are made from a perforated plastic sheet, all unneeded holes were filled and then sanded down.


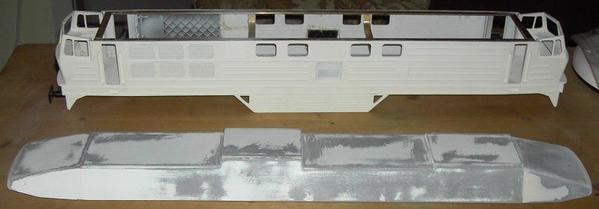
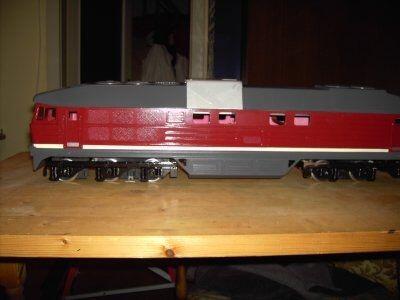
The chassis with both driver's cabs is ready-to-use and sprayed with filler. Next up is the partially removable roof. The three-axle bogies (can be folded in themselves) also pass through R1 radii.
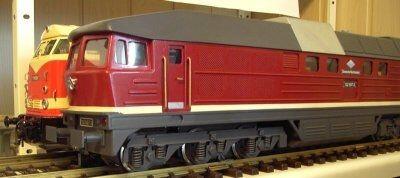
Ludmilla is now clearly recognizable.


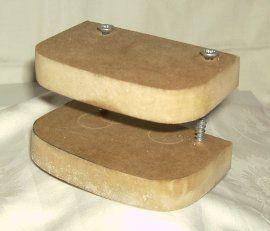
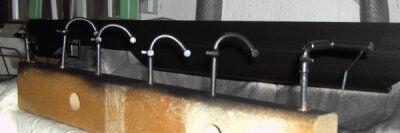
Since I just got my hands on a thick roll of enamelled copper wire, I first continued to design the chassis. The wire is wound onto a 5 mm thick aluminum tube.
This results in the suspension springs after a brass washer has been soldered onto both sides. The heads of hexagon bolts mimick the axle bearings.


On Friday, July 13th, Lidmilla made the first test laps in Rathen on the three-axle bogies without any problems.
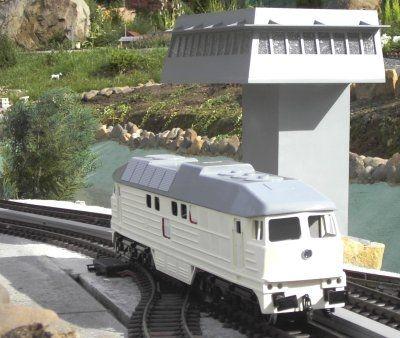
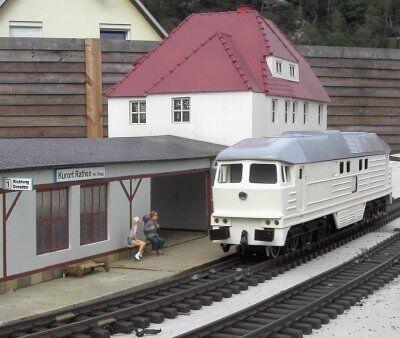
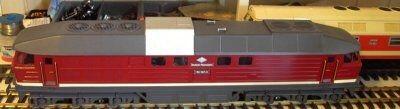
Just 2 hours later, color finally comes into play in my workshop.
The roof is sanded and gets the next coat of paint, while the chassis gets the first coat of purple.


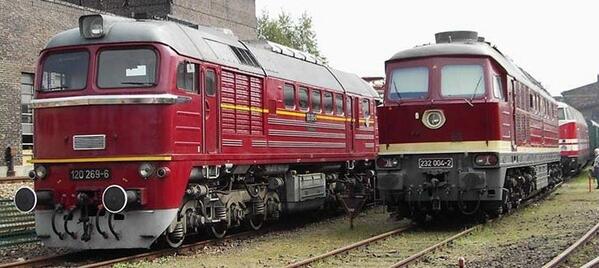
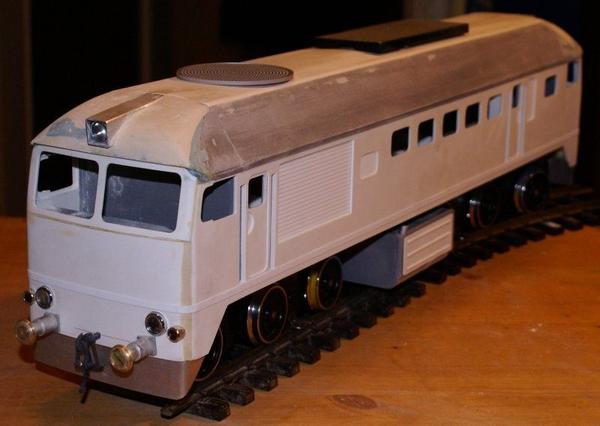
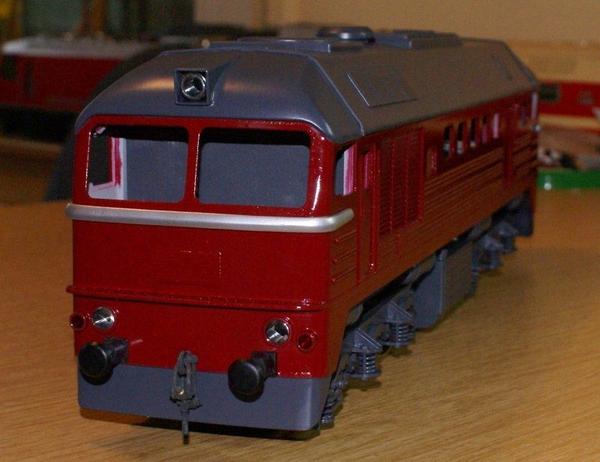
Diesel locomotive BR120 of the DR
Self-made diesel locomotive of the series V120 - Taiga drum - of the Deutsche Reichsbahn in the hobby workshop of our team member Rainer Schüßler
The third large diesel locomotive of the Deutsche Reichsbahn, the TAIGATROMMEL, is now being built here.
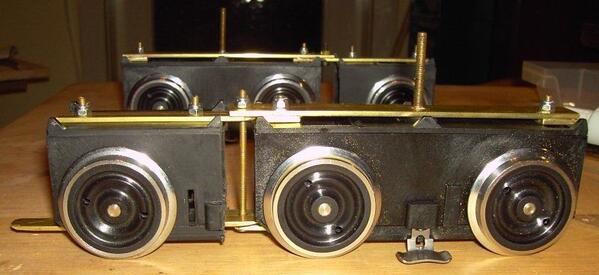


The three-axle bogies are again made from standard LGB drives.
A drive block without a motor is sawn through and then all the necessary connecting parts are made from brass.


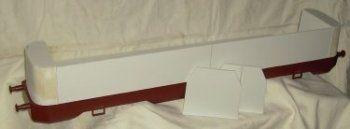
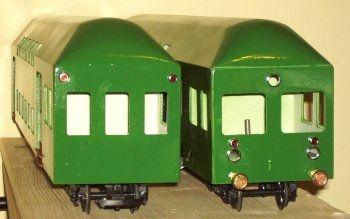
Four-part double-decker train of the DR
Self-construction of a double-decker unit for the Deutsche Reichsbahn in the hobby workshop by our team member Rainer Schüßler
Now that the V180 diesel locomotive is finally ready, the matching double-decker train follows. An
H0 model and original pictures that I made at the Heizhausfest in Chemnitz-Hilbersdorf served as a template .


The frames for the chassis are again made from aluminum profiles which are sawn in, angled and glued with epoxy resin.

I had the side parts and all the necessary frames milled at Accribis in Dresden (www.accribis.de) according to my drawings and measurements. There you can get all possible parts CNC milled in the best quality at a very reasonable price.

For reasons of time, and above all to keep the side parts of the same quality, this was the best solution for me. All windows are milled back so that the panes can be glued in later without any problems.

Then I sawed 5 mm thick plastic panels in strips and glued and screwed the aluminum strips with them.

Now the frames were glued on at the intended places. The side parts had a back milling at the kink to make them easier to bend.

A finished end part still without a roof.

Both end parts sit on the chassis for testing purposes and the first driving test went as expected. The individual parts swivel out a lot with a length of 75 cm, but even an R1 bend is no problem.

A PVC cable duct again served as the roof, while Alfer profiles were again used for the entry steps and cladding.
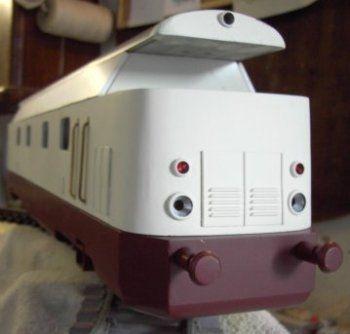
The two end cars have just received their attachments.
I use LEDs again for the lighting. These sit in red LED caps or, for the headlights, in LED spotlights with glass lenses from Conrad. The buffers were made of brass and I got the bracket couplings from Regner.
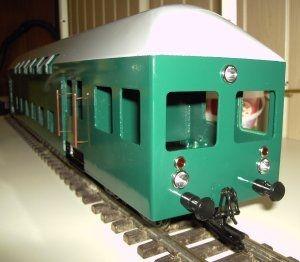
The control car with final paintwork and inserted headlights and taillights. The handle bars, which were only available on end cars, are also fitted. The next step is the labeling with adhesive foil.

Now all that is missing are the window panes and the bellows of the car transitions.
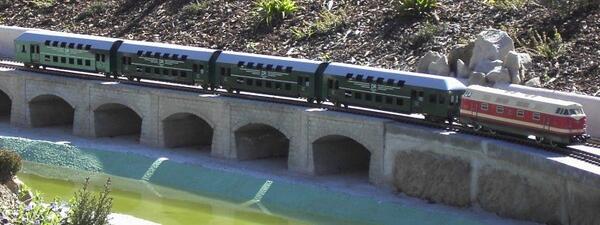
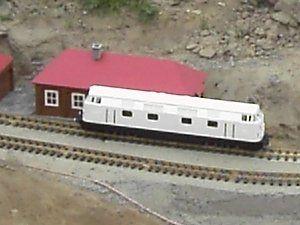
The ready-to-use model on loan on the Bad Schandau - Dresden main line in the Eisenbahnwelten in the health resort of Rathen.

